
Expressive Self-Portrait Photography: How to Take Meaningful Self-Portraits
As a self-portrait photographer, I draw inspiration from anywhere – mostly from my emotions and experiences.
Many people ask me how I take my conceptual self-portraits, so I thought I’d dedicate today’s article to expressive self-portrait photography.
First, I’ll talk about why self-portrait photography is such a great tool for expressing yourself.
After that, I’ll explain what I mean by expressive self-portrait photography and share four ways to inspire your own expressive self-portraits.
I’ll also briefly discuss the technical aspects of self-portrait photography and explain what you’ll need to take your photos.
Let’s dive in!
1) Why Take Self-Portraits?
By now, you may wonder…why self-portraits?
Well, I strongly recommend trying out self-portrait photography for a few reasons.
First of all, the camera is a helpful tool for bringing your creative vision to life.
Yes, you may need a few pointers regarding technical setup and getting the focus right, but other than that, it’s very straightforward.
Also, you don’t need particular skills, so the barrier to entry is very low (as opposed to, say, drawing or painting, where you may need a bit more practice).
You don’t really need a lot of equipment, either; in principle, a camera is enough (a tripod and other accessories are helpful but optional).
1.1 Creative Freedom
Next, taking self-portraits gives you total creative freedom (unlike working with a model).
Since you are both the model and photographer, you can shoot whenever and wherever you want, and you have the easiest model to work with – yourself.
This is so freeing because you don’t need to rely on anyone else on the day of your shoot and can get started whenever you feel like it.
1.2 Better Technical Skills
Finally, taking self-portraits helps hone your technical skills:
The more self-portraits you take, the more you will improve your understanding of lighting, camera settings and visual storytelling.
2) What Is an Expressive Self-Portrait?
Now, let’s look at what I mean when I talk about expressive self-portraits.
For this purpose, let’s contrast “expressive” or “conceptual” photography with “regular” photography:
Photos to Represent Reality
Most people take photos to represent reality.
For example, they take pictures of a beautiful landscape, a pretty flower, or friends and family.
Other, more commercially focused photographers photograph weddings, products, or people.
These photographers mostly don’t create from their own imagination but document “what is.”
Photos Based on Your Own Imagination
Conversely, fine art photography, the category under which I would file expressive self-portrait photography, is based on the individual experiences and background of the photographer, often depicting more abstract concepts or ideas.
Therefore, taking an expressive self-portrait means not merely taking a selfie, i.e. a photo of yourself without any particular intention other than looking nice.
Instead, you’re taking a photo of yourself representing something – an emotion, an experience, etc.
As the term “expressive” suggests, you’re trying to express something with your image, the way an artist would want to express something with their artwork.
This means you don’t just set up the camera and take random pictures.
Instead, you take some time to think about the intention behind your photograph.
In the next part, I’ll talk about four ways to figure out that intention and create meaning behind your self-portraits.
3) Expressing Yourself in a Self-Portrait: 4 Ways to Find Inspiration
There are many ways to get inspired for your self-portraits–here are four methods that I often use to come up with ideas:
Express How You’re Feeling Right Now
The perhaps easiest entry point into expressive self-portrait photography is to use your current emotional state.
Ask yourself:
How am I feeling right now?
Then, set up your camera (I’ll discuss the technical aspects later in this post) and express your emotional state in front of the lens.
Some tips for this process:
Use Makeup and Styling
It can help to “exaggerate” your feelings by using wigs, makeup, and clothes.
For example, if you’re feeling sad, you can apply mascara and smudge it (I’ve once even used fake tears made from cheap glycerine).
If you’re feeling particularly happy, try using bright, cheerful-coloured makeup, etc.
Use Body Language
Use not just your facial expressions but also your body language to express your emotional state.
Examples:
- hunched posture with rounded shoulders and head hanging down for sadness
- hands on hips, upright posture, chin up, “proud chest” for self-confidence or motivation
- folded arms, averted gaze for feeling discomfort/embarrassment
- clenched fists, leaning forward for anger, and so on.
Use Colour Psychology
Use colour psychology to underscore your emotions.
Specific colours represent certain emotions, e.g. red for anger (or love, paradoxically; yellow/orange for happiness/joy; blue for sadness, etc.
You can wear clothing in that same colour and use make-up or even coloured backdrops or objects.
Use Your Past Experiences
Another great way to find ideas for expressive self-portraits is to use your past experiences.
I’ll give you an example:
Before I started my photography business, I was training to become an artist, concentrating only on drawing and painting.
Sadly, I had to give up my dream due to a chronic injury, a tennis elbow on my left arm.
I wasn’t able to draw regularly, and I still suffer from pain to this day.
As you can imagine, this was a very frustrating and upsetting experience, and at the time, it made me very sad.
However, eventually, I decided to channel this sadness into a self-portrait…here it is:
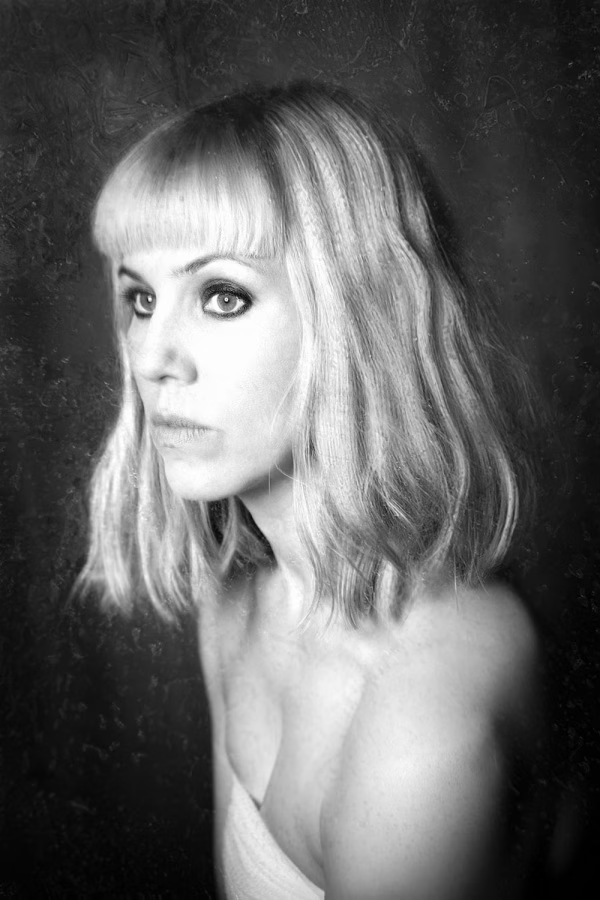
It portrays me as “under ice,” representing a sort of “creative frost” – my inability to create.
If you, too, want to use past experiences as inspiration, consider events in your life that are particularly emotional.
By the way, these don’t have to be negative.
They could also be positive experiences, such as a wedding, the birth of a new family member, or an unforgettable trip.
Then, grab a pen and paper and make a little mind map.
Write the experience or event in the middle and jot down any associations you have with it.
In my case, the mindmap would have looked something like this:
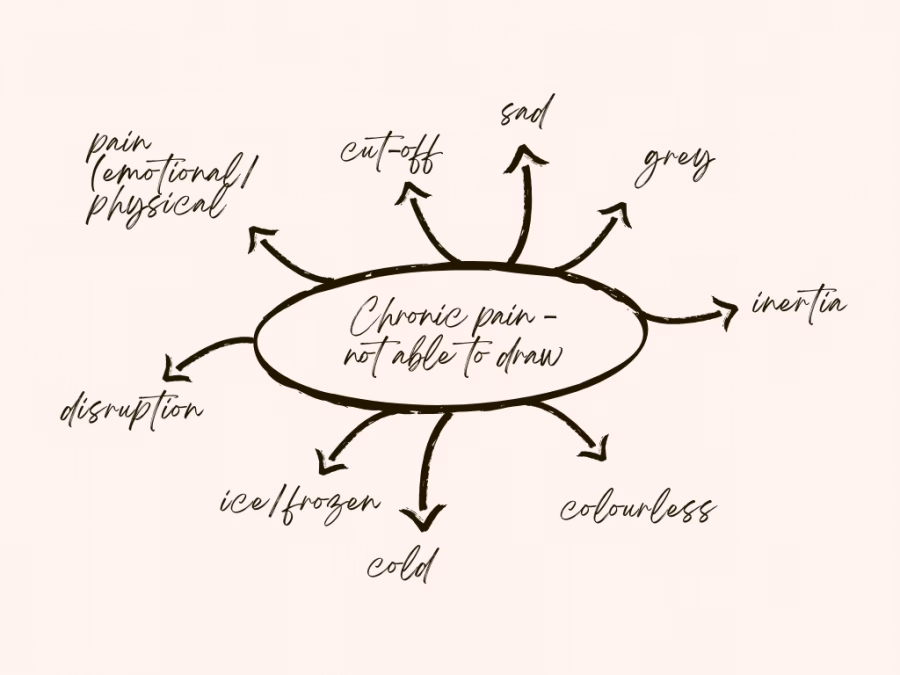
Now, pick two or three words that really stand out to you/that feel the most fitting/relevant for the experience and the emotions attached to it.
In the next step, write down some associations with these terms – find colours, symbols, objects, etc., that can be tied to the experience.
It doesn’t matter whether these are universal associations or simply your own personal ones.
For example, for my shoot, I went for:
- black and white–symbolises “grey” state of mind, sadness
- ice–symbolises the “creative frost period” I was in
- medical bandage (worn as a top)–symbolises sickness and frailty (I cropped this out in the final image as I didn’t like the composition).
This associative phase is really useful for developing your shoot idea.
The colours, objects, textures, materials, etc., you come up with make your idea more concrete and inform the “art direction” for your project.
As in point 1, also use body language to express your concept.
By the way, don’t limit yourself to one image here.
You can also create a small series to tell your story in more detail or develop your narrative over several photographs.
Before I get to the next point, make sure to check out my free ebook with 50 self-portrait ideas:
Free Ebook-50 Self Portrait Photography Ideas
Do you love self-portrait photography, but lack inspiration for your shoots? Then download my e-book with 50 ideas for self-portrait photography!

…but now, onto the next inspiration source: expressing your ideal self.
Express Your Ideal Self
There’s another great inspiration source for expressive self-portraits:
You can try to capture “who you want to be”.
This sounds a little weird, so let me explain!
We can all think of certain personality traits we would like to have, such as courage or confidence.
For example, I am naturally rather shy and introverted, and sometimes I would love to be a bit more outgoing and “extra” (especially in the dance classes I go to, where I could use a bit of “diva energy” 😊 )
I used this disparity between who I am and who I want to be to inspire my self-portrait “Alpha”.
It shows an uber-confident, feral-like alpha female who takes what she wants:
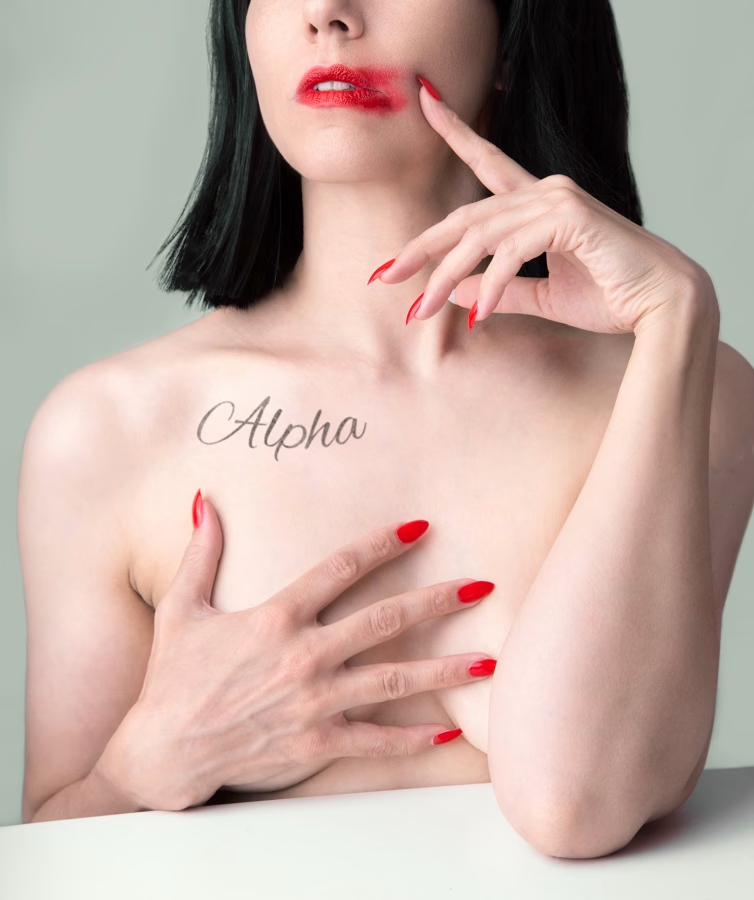
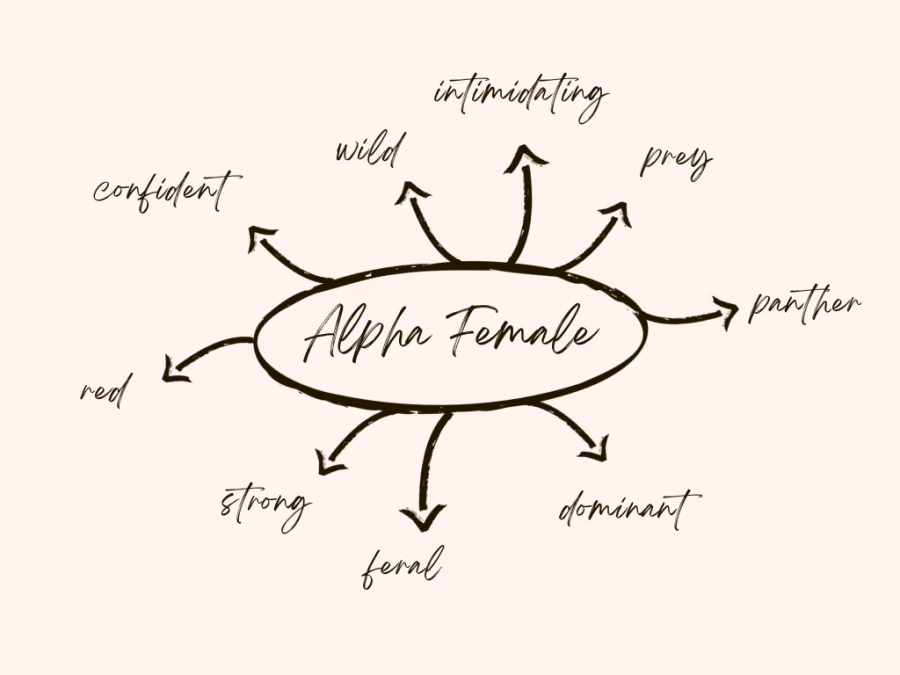
To develop the idea, I used the mindmap technique from the previous point, basing it on the word “alpha”.
The final mindmap looked something like this:
Express Your Personal Views
Another method for generating expressive self-portrait photography ideas is expressing your views on current events, such as societal issues, politics, or environmental issues.
For example, I’m currently working on a self-portrait inspired by the censorship of female bodies.
This self-portrait idea is not based on personal experience; instead, it is a commentary on the current state of the media (and the world).
So, if something in the world makes you angry, sad or upset, use it!
You can develop your idea based on the same methods as explained above:
Use word associations, colours, symbolism, props, body language and make-up/costumes to express your opinion or ideas.
I promise to keep this blog completely ad-free so you can read without distractions. If you want to support my work, buy me a coffee: It’s a small gesture that makes a big difference!
One Last Tip
One last tip for all of these approaches:
Don’t make it too complicated.
Try to avoid fitting several ideas into one picture.
Always think: how can I dilute my potpourri of ideas into one streamlined concept? (If that’s not possible, it’s better to create a series).
Concentrate on one or two symbols, prop colours/colour themes, etc., to make your concept as clear as possible.
I know it’s tempting to cram your picture full of different ideas, but try to keep it concise, as this will help the viewer of your images to understand what’s going on.
4) Setup and Gear
So…..you’ve got your idea, but how do you actually take the picture?
I’ve described the technical process of taking self-portraits in previous posts, so I’ll keep it brief here.
However, you can download my free beginner’s guide with technical tips for self-portrait photography below, which covers all the technical aspects:
Free Ebook: Self-Portraits Made Easy
If you love taking self-portraits but struggle with the technical aspects, download my free guide with essential self-portrait photography tips and common mistakes to avoid.
Here are some quick pointers:
Equipment for Self-Portrait Photography
Generally, you will need a camera (a phone works, too, as long as it has a self-timer).
I also recommend you use a tripod, although it’s not strictly necessary.
If you don’t have one, lean your camera against some books and put a rolled towel or t-shirt under the lens to keep it straight.
Focusing
To get the focus right, set your camera to autofocus–face/eye tracking mode.
If you have a digital camera with Wi-Fi or Bluetooth compatibility, I recommend using an app to shoot remotely.
It’s really helpful because you can see yourself on the phone screen (which helps with composition) and tap where you want the focus of the image to be.
With most apps, you can also set a delay so you can remove the phone from the frame before taking the picture.
If your camera doesn’t have this functionality, you can use a remote trigger (wired or wireless).
Focusing with Older/Analogue Cameras
For older/analogue cameras, use the good old self-timer button on the camera!
If you do this, though, make sure to place an object where you’ll sit or stand and focus on it.
Then, switch to manual focus so the focus will remain the same, remove the object, and stand or sit in precisely that place.
It’s not the most accurate method, but it does work.
Next Steps
I hope you’ve found this post helpful! If you want to really master self-portrait photography, I recommend my full self-portrait guide:
My Ebook: The Self-Portrait Guide!
Would you like to learn more about self-portrait photography? Then check out my ebook now! Topics include:
- how to use natural and artificial lighting
- essential gear you’ll need for self-portraits at home
- idea-finding techniques to develop concepts for photo shoots
- how to edit, export and print your images, and more!
