
Photography as Art: How to Create Images That Actually Mean Something
When you ask most people why they take a photograph, the answer will be something like:
“I wanted to capture a person, a pet, or simply a special moment.”
I’m a professional photographer known for my artistic self-portraits, and I would answer this question very differently:
Instead of documenting “what’s there”, I use the camera as a tool to realise an artistic concept or theme.
Hence, the camera is to me what a paintbrush and canvas are to a traditional artist.
Benefits of Approaching Photography as Art
Approaching photography as art in this way may seem complicated, but it’s really not!
It simply means being more intentional about what you photograph and using stylistic tools, such as composition, lighting, colours, patterns, etc., to create more aesthetically pleasing images.
To illustrate why it’s worth doing this, check out the two photos below:
This first photo is a generic landscape photo taken without any particular artistic aspirations.
It’s fine, but not very interesting:

In contrast, look at this image; you can see that the artist put more thought into the composition, and they also used colour grading to give the photo a more artistic look:

Don’t Take Photos, Make Art
In general, there are two easy ways to create more artistic photographs:
- Take your photo with a narrative, concept or theme in mind (storytelling approach)
- Focus on visual appeal (aesthetic approach)
Let me briefly explain both of these in the next section!
1. Storytelling Approach
In photography, storytelling simply means that you develop some kind of narrative or theme for your image before you press the shutter button.
This doesn’t have to be complicated at all; it could be enough to explore a theme like solitude, freedom, identity, or even transformation.
Or you could use colours or composition to represent nostalgia, grief, or joy.
Here’s an example from my photography, inspired by the emotion of loneliness/heartbreak:
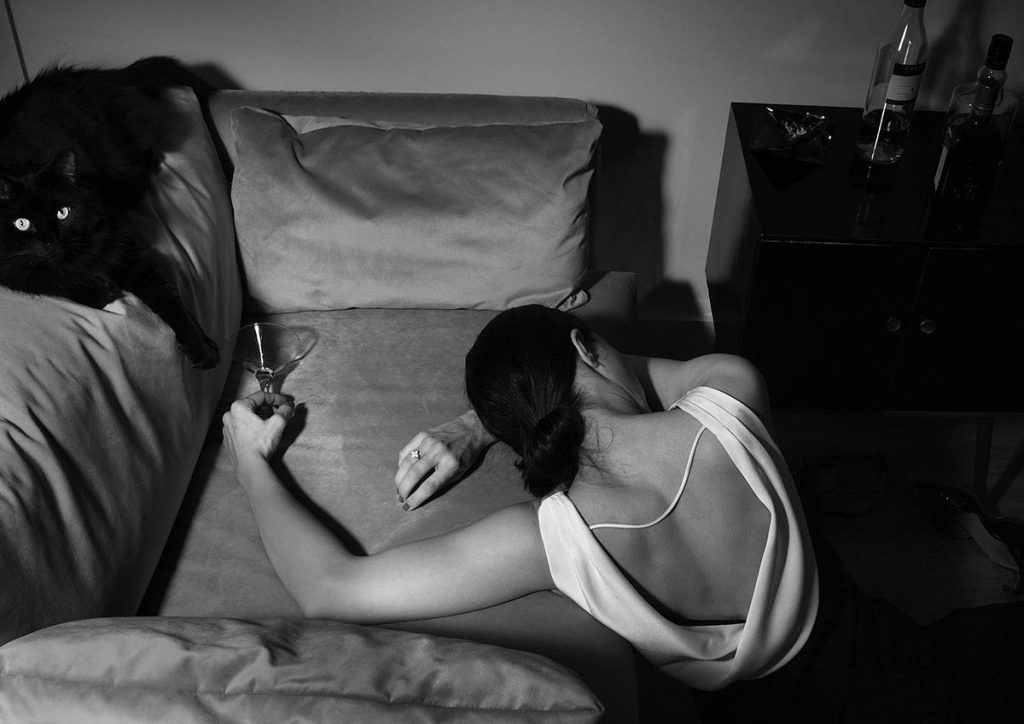
The point isn’t to overthink or make this super intellectual.
Instead, try and begin with a feeling or a question.
I find that when you do that, your photos naturally start to say something, not just show something.
I’ve actually written a whole post on telling stories through images, so if you’re interesting in finding out more, check it out here.
2. Aesthetic Approach
Another way to approach photography as art is to focus purely on visual aesthetics, i.e. how an image looks rather than what it “means.”
In this approach, you’re thinking about elements like composition, symmetry, contrast, colour harmony, or texture.
You may focus on leading lines that guide the eye, negative space that creates tension, or the intentional use of warm or cool tones for different effects.
With this approach, the photo might not tell a literal story, but it creates a mood.
Here’s a great example of an aesthetically pleasing photograph of a staircase:

I have also written an in-depth blog post on how to create more aesthetic, beautiful photographs, you can find it here.
5 Tips for More Artistic Photographs
Now that we’ve explored what elevates a photograph from snapshot to art, let’s look at some practical tips that you can easily apply to your own photography.
1. Get Familiar with Your Tool
If you want to approach photography as an art form, the first step is kind of obvious (but worth mentioning anyway):
Learn how to use your camera’s manual mode.
Most people start with automatic mode, as it’s the most accessible.
However, automatic settings are designed to create a technically “correct” exposure, not necessarily a creative or aesthetically pleasing one.
In auto mode, the camera makes decisions for you, based on what it “thinks” you want.
The problem is, your camera doesn’t know your artistic vision or intention.
In contrast, if you shoot in manual mode, you have complete control over your exposure and stylistic decisions, allowing you to create the exact picture you want.
The Exposure Triangle
The three main settings of a camera are grouped as the exposure triangle.
They are:
- Shutter speed, which controls how motion is depicted, e.g. if your moving subject is totally sharp or blurry
- Aperture, which affects depth; a wide aperture can create a blurry background, while a narrow aperture keeps everything sharp and in focus.
- ISO, which adjusts your camera’s sensitivity to light.
Learning these settings might seem a little intimidating at first, but I promise you, it’s much easier than you think.
I actually wrote two in-depth blog posts covering the basics of manual mode: read all about shutter speed and ISO here, and master aperture and depth of field here.
2. Start with the Story, not the Subject
This next tip is super effective and will give you better photos immediately:
Before you pick up the camera, take a moment to think:
What emotion or narrative do you want this image to convey?
This shift really helps, because you’re not just taking a photo of whatever looks cool, but what feels meaningful.
Instead of reacting to what’s in front of you, you’re creating with intention.
Always ask yourself:
What do I want the viewer to feel when they look at this photo?
Once you know the feeling or idea you want to convey, the rest of the image, such as subject, setting, styling, lighting, and so on, will fall into place.
If you’re not sure how to do this, try starting with a question, e.g.:
- What does solitude feel like in a crowded place?
- How can I show strength without showing the face?
- What does ‘home’ look like?

Street photography with storytelling element.
For this kind of storytelling, you don’t need words; instead, you’re using posing, composition, light, and colours to convey your narrative.
What’s great about this approach is that your photos will have more depth and impact, and you may notice that they resonate more with viewers because they are meaningful rather than just beautiful.
3. Start Developing Your Visual Style
My next tip for approaching photography as art is to consider your visual style.
What do I mean by that?
Well, visual style isn’t about trends or filters on Instagram.
Instead, I’m referring to a visual aesthetic shaped by things like contrast, tone, composition, colour palette, etc.
How to Develop Your Visual Style
To develop your own visual style, start by noticing what you find interesting:
Do you love high-contrast, bold images?
Or maybe you prefer soft, low-contrast, dreamy tones?
Really make note of all elements you’re drawn to in photography:
Are you a fan of muted colours, natural light, organic compositions, graphic shapes, surreal edits, symmetry, and so on?
One of the best ways to explore your visual style is to study the work of other photographers and artists.
Again, keep track of what kinds of images make you stop and look closer:
What visual styles make you feel something, even if you can’t explain why?
I recommend you start a mood board to save your favourite images as inspiration, but instead of copying, ask: What about this image speaks to me, and how can I recreate that in my own way?
Also, keep in mind that your style doesn’t need to be consistent right away–this is something that will evolve with time and practice.
You may even start to develop a few different signature styles, which is totally fine!
For example, I have two distinct styles: a very painterly, fine art look, and a more editorial, fashion magazine-type style.

One of my recent painterly self portraits, leaning into my painterly, fine art style.
The main thing when it comes to developing your photography style is to take pictures with intention, and to constantly reassess which visual elements you’re drawn to or are less interested in.
Over time, you will notice certain patterns in your work, which will become increasingly refined in the process.
Before I get to the next tips…did you know you can download my free ebook? More info below:
Free Ebook: 50 Portrait Photography Ideas
If you need fresh inspiration for your portrait photography, download my e-book which contains 50 creative ideas and projects for portrait photography.

…but now, back to the blog post!
4. Use Light as a Stylistic Tool
Next, let’s talk about using light as a stylistic tool to create more artistic photographs.
Light is actually one of the most powerful tools you have as a photographer–and also one of the most overlooked.
When we take everyday photos, we often work with whatever light is available, such as overhead room lighting, cloudy daylight, or golden-hour sunlight.
For regular snapshots, that’s of course totally fine.
However, when approaching photography as an art form, light is an incredible tool because you can shape and manipulate it to create a specific mood or aesthetic.
For example, harsh, direct sunlight can create strong shadows, bold highlights, and a sense of drama or intensity.
That’s why it can be the perfect choice to convey intense emotions or visual tension.
On the other hand, soft, diffused light (like window light on a cloudy day or golden hour light) can make your image feel more gentle, intimate, or dreamlike.
You can also use shadows as as a storytelling element; e.g. a shadow across the face to make the subject look mysterious.
When using light as a stylistic tool, always think about how light interacts with your subject:
- Do you want it to reveal or conceal?
- Do you want to add drama or softness?
- Do you want to use natural or artificial light?
I want to show you some examples of different lighting scenarios so you can see the huge difference lighting can make:

In this image, the lighting is quite hard (you can tell by looking at the shadows, which are very defined rather than soft and blurry).
The effect is strong and graphic, and visually very striking (especially because the image has been converted to black and white, which tends to work very well for this type of hard lighting).
By the way, I highly recommend experimenting with artificial lighting, as this will give you a lot more control and creative possibilities.
If you’re new to artificial lighting, check out my blog post on the topic here.
In contrast, have a look at this image with very soft, diffused lighting (it was probably shot with a softbox):

Here, you see only minimal shadow areas on one side, and the shadow edges are soft and undefined.
This, coupled with the blue light or filter creates an intimate vibe and makes the subject appear vulnerable and pensive.
And here’s one last example of using light as a stylistic tool:

What the photographer has done here is to intentionally place the model in front of the light source.
This creates a lot of shadows on her face and body, making the scene very mysterious and sensual.
5. Think About Colour Like an Artist
Just like light, colour is a really powerful tool to convey emotions in your images.
Interestingly, this often happens subconsciously for the viewer–they may not notice the colours, but instinctively feel the mood.
Different colours carry different meanings/evoke different themes and emotions:
Warm tones, such as gold, orange, or soft pink, tend to evoke feelings of intimacy, energy, comfort, and passion.

Photo in warm tones that really enhance the cosy, intimate feel.
Cool tones, such as blue, grey, or green, evoke stillness, solitude, melancholy, or calm.
Even going monochrome can be incredibly powerful:
By taking the colour away, you make the viewer focus on light, form, and expression instead.
Black and white photography can feel timeless, serious, or nostalgic, depending on how you use it.

In this photo, the black and white aesthetic enhances the nostalgic feel.
As a visual artist, the more you start thinking intentionally about colour, the more control you have over how your image feels.
If you want to deepen your understanding of colour, I recommend studying film colour grading.
Cinema uses colour incredibly well to guide emotion and mood:
Think of the dreamy pastels of Marie Antoinette, the bright reds of Amélie, or the cool, desaturated tones in Her.
(A great tip is to watch with the volume off and notice how colour alone conveys aspects the story!).
A great tool for learning more about colour grading in cinema is this Instagram account, sharing colour palettes of different movies.
By the way, you don’t need elaborate setups to experiment with colour.
Try shooting near coloured walls, using wardrobe and props intentionally, or adjusting your white balance and tones in Photoshop.
If you want to dive deeper into the subject of colour in photography, check out my colour grading blog post here.
And that’s it for today!
Which of these tips resonated the most with you? Let me know in the comments!
Thank you for visiting my blog! If you want to support my work, buy me a coffee: It’s a small gesture that makes a big difference!