
How I Take Creative Self Portraits While Travelling
If you Google how to take pictures of yourself while travelling, you will usually find lots of advice on taking better selfies or getting that perfect Instagram travel shot.
But what if you want to take an actual self-portrait – something a little more creative, artistic or even fine-art inspired?
Personally, I LOVE taking self portraits when I travel.
I always get a huge burst of inspiration when I’m somewhere new, and some of my favourite self portraits have actually been taken away from home.
There’s something magical about being surrounded by different colours, interesting interiors, unfamiliar landscapes and completely different light, all of which give me lots of new ideas for photographs.
The only problem is that, obviously, I can’t pack my entire photography studio every time I go somewhere!
Over the years, though, I’ve realised that I really don’t need to, because a tripod, a few small pieces of photography gear and a couple of lightweight props are usually enough to turn a random hotel room or Airbnb into a temporary photo studio.
So, in this post, I’ll show you how I take creative self portraits while travelling, including what I look for when booking accommodation, the props and photography gear I actually bring with me, and how I find ideas once I arrive.
1. Choose Your Accommodation Like a Photography Location
This is probably the biggest tip I can give you, and it applies before you even leave home.
When I’m booking accommodation, I’m not just looking for somewhere nice to sleep; I treat the search like a location-scouting session.
For example, if I’m choosing between two similarly priced places and one has an interesting interior, unusual colours or beautiful windows, that one will definitely win.
I particularly love slightly quirky or retro interiors, like places with interesting wallpaper, old furniture, colourful bathrooms, strange curtains or lamps – anything that looks as though it could belong in a film set rather than a generic hotel room (think The Grand Budapest Hotel).
As an example, have a look at this photo, which I took in a beautiful, 1950s style AirBnB in Riga, Latvia:

By the way: This doesn’t mean you need to stay somewhere expensive. In fact, the slightly odd little Airbnb with weird 1970s wallpaper is often way more affordable than the pristine luxury hotel.
The other thing I look for is good natural light, ideally with large windows in more than one room.
Before booking, I’ll usually go through the photos quite carefully to see where the windows are and how much daylight the space seems to get.
Window light is one of the easiest ways to create beautiful self-portraits without having to bring extra lighting equipment.
Obviously, you can’t know exactly what the light will be like until you arrive, but lots of large windows at least give you a pretty good starting point.
Just a quick interruption to say: I’ve written a free ebook with lots of self portrait ideas, you can download it here:
Free Ebook-50 Self Portrait Photography Ideas
Do you love self-portrait photography, but lack inspiration for your shoots? Then download my e-book with 50 ideas for self-portrait photography!

…but now, back to the blog post!
2. Pack a Few Handy Props
Now, I don’t travel with a suitcase full of photography props, but I do always bring a few things that take up almost no space but can completely transform a self-portrait.
For me, that usually means one or two wigs:
I’ve used wigs in my self portrait photography for years because they’re such an easy way of creating a character or changing the mood of an image.
They weigh almost nothing and can make two photographs taken in exactly the same room look completely different.
In addition, I always take 2 or 3 dresses that photograph well. Dresses are perfect because they’re basically a complete outfit!

Self-portrait in a cheap vintage lace slip dress I take on almost every trip!
Sometimes, I also bring some nice lingerie if I think I might want to create something more boudoir-inspired.
Finally, I always bring some makeup – nothing elaborate, just enough to give myself options.
3. My Essential Gear for Creative Self Portraits While Travelling
When it comes to photography gear, I try to travel as minimally as possible, given that photography equipment gets heavy very quickly.
Here’s what I usually take with me.
(Just so you know: This section contains affiliate links. As an Amazon Associate/partner of other affiliate programs, I earn from qualifying purchases).
3.1 A Lightweight Travel Tripod
If you’re taking more artistic style self-portraits rather than selfies, a tripod is probably the most important thing to bring.
I prefer a lightweight travel tripod that folds down small enough to fit easily into my luggage but is still stable enough to trust with my camera, like this one:
K&F CONCEPT Carbon Fiber Lightweight Tripod
3.2 A Camera That Performs Well in Low Light
My main camera is the Sony A7 IV, which is a full-frame camera and amazing for self-portraits in general.
You absolutely don’t need a full-frame camera to create beautiful self-portraits, but travelling is one of those situations where it really comes in handy.
The reason is that I love creating darker, moodier photographs and frequently work with relatively low levels of natural light.
A camera that performs well at higher ISO settings, which full-frame cameras do, gives me more freedom to work with the atmosphere that’s already there rather than having to use flahes or other artificial lighting.
Here’s an example:

3.3 One Versatile Lens
I don’t like carrying several lenses when travelling, so I bring one versatile lens that covers the focal lengths I use most often.
I particularly like having something around the 35–50mm range:
50mm gives me a more traditional portrait perspective, whereas 35mm is amazing for more cinematic portraits where I want to include quite a lot of the environment.
If you’re photographing yourself in small hotel rooms, having the option to go a little wider can also be extremely useful.
There is nothing more annoying than having a lovely idea and discovering you physically cannot move your tripod far enough away from yourself.
Here’s the lens I use:
Sony SEL28702 Full Frame Standard Zoom Lens FE 28-70mm
3.4 A Small LED Light Panel
This is probably one of my favourite additions to a travel photography kit.
Small LED panels weigh very little, don’t take up much room and can make a huge difference when the available light isn’t working for you.
I don’t usually use one to completely light a scene; instead, I might add a little light to my face, create a glow from one side or balance out very dark shadows.
Here’s an example:

3.5 A Diffusion Filter
I always have a soft diffusion filter with me!
I love the slightly hazy, cinematic quality that it adds to highlights, particularly when there are lamps, windows or other bright areas within the frame.
My favourite is my Walking Way diffusion filter.
3.6 Coloured Gels
Another super lightweight thing I love bringing is a small selection of coloured lighting gels.
They take up almost no luggage space, but can totally transform any room:
You can place them over an LED or flash to introduce coloured light, combine two colours or use them very subtly just to shift the atmosphere.
Here’s an example where I used a red gel in a bathroom in Tokyo:

You can buy coloured gels here:
3.7 A Flexible “Octopus” Tripod
This is another surprisingly useful little tool!
A flexible tripod allows me to put either my camera or phone in places where a traditional tripod doesn’t work.
Depending on the model and weight limit, you can wrap it around railings, furniture or other stable objects and experiment with unusual angles.
I also use mine to position my little LED panel, which means one tiny accessory can do several jobs.
3.8 A Remote Shutter
Finally, don’t forget to bring some way of actually triggering the shutter.
Depending on your camera, that might be a physical wireless remote or an app on your phone.
I personally use an app connected to your camera, but if you prefer using a physical remote, make sure to pack it!
Technically you can use the self-timer, but running backwards and forwards between the camera and your position becomes rather annoying very quickly 🙂
4. Let the Place Give You the Ideas
This is probably my favourite part:
I don’t usually arrive somewhere with a finished self portrait already planned.
Instead, I let the place influence what I make: I walk around, visit museums and galleries, look at architecture, shop windows, colours, plants, clothing, food, etc.
Sometimes I’ll pick something up to use in a self-portrait, such as flowers, a tiny object,…or even fruits, like the lemons in this self portrait taken in Siciliy:

5. Study the Light Before You Start Shooting
When I arrive at new accommodation, I always pay attention to what the light does throughout the day, for example:
Where does the morning light fall?
Do shutters create interesting patterns?
Does a tiny beam of sunlight appear on one wall for twenty minutes?
Here’s an example of some beautiful shadow patterns I wanted to capture:

Sometimes I’ll notice something and think, I need to come back here at 8am tomorrow.
This is one reason I find natural light so inspiring: You’re responding to something that already exists – and because the light changes from place to place, it can lead you towards photographs you wouldn’t have created at home.
6. Use the Accommodation Itself as Inspiration
Next, don’t just look at your Airbnb or hotel as a backdrop – look at what’s actually in it!
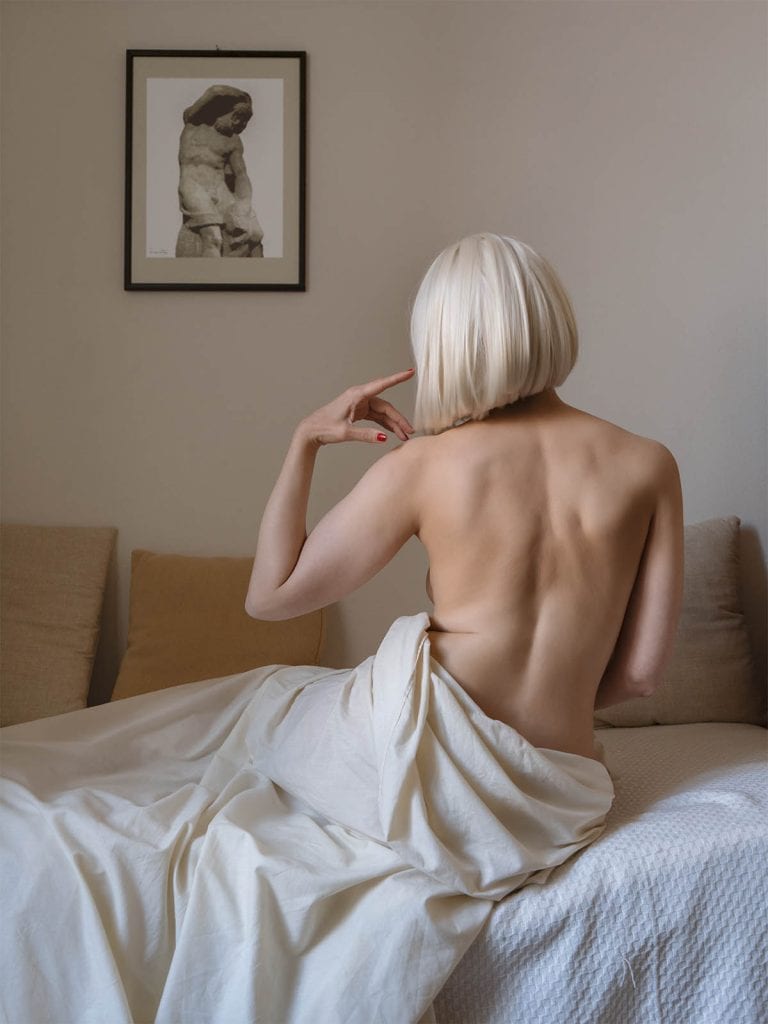
I’ve created photographs because of pictures hanging on the wall, strange furniture, mirrors, curtains and colour combinations I would never have chosen myself.
Look at this self portrait, which was solely inspired by the art print on the wall:
Unfamiliarity Breeds Inspiration
One of the reasons I love taking creative self portraits while travelling is that everything is unfamiliar, which can be incredibly useful creatively.
Some of my more interesting photographs have come from travelling, not because I brought an enormous photography setup with me, but because the new environment made me think differently.
And that’s really the point of everything I’ve listed here; you don’t need to travel with a portable photography studio!
An interesting location, coupled with a camera, one useful lens, a tripod and a few small creative tools are enough.
And this is something I’m about to explore much more myself:
After more than two decades of living in London, I’m leaving in two weeks and spending the next few years travelling – beginning with an artist residency in Japan.
So expect to see some more self-portraits from the road very soon!
Next Steps: Learn to Take Self Portraits Like a Pro
My Ebook: The Self-Portrait Guide!
Would you like to learn more about self-portrait photography? Then check out my ebook now! Topics include:
- how to use natural and artificial lighting
- essential gear you’ll need for self-portraits at home
- idea-finding techniques to develop concepts for photo shoots
- how to edit, export and print your images, and more!
